Editor’s note: Today it’s my honor and privilege to present an article by guest author Beverly Voth, whose contributions to the FileMaker community are numerous and much appreciated. It’s great to have her back here on FileMaker Hacks.
FileMaker 13 & 14 have some features that can be leveraged to allow one layout to toggle between Form View & Table View and look differently! We will be using the Starter Solution, “Contacts”. Feel free to download the demo file (Contacts14.fmp12.zip) or you may start with a fresh copy of the database file or another Starter Solution and follow the steps below.
NEW to Starter Solutions? Select “New From Starter Solution” under the File menu. Click the “Contacts” icon and click on the “Choose” button. A dialog will come up with the “Save As” field filled in with the name of the database file you chose. Navigate to where you wish to save the file and click the “Save” button. This will open the file to the default layout and be ready to change.
The default layout for Contacts is “Contact Details”, is in Form View and shows two “tab-like” buttons called: Contact List & Contact Details. These are buttons that Switch you to different layouts. Notice how the placement is the same and there is a smooth transition between the two layouts. You may also notice that the view is “locked” to just allow View as List or View as Form (respectively). You cannot select other views on these two layouts.


Start by duplicating a form layout
Start the transformation by selecting the File menu, Manage submenu, Layouts. You should see the dialog below:

“Contact Details” should be highlighted; if not click once on it to highlight and click the “Duplicate” button at the bottom of the dialog. Click once on the new “Contact Details Copy” (if not already highlighted) and click the “Edit” button at the bottom. In the Layout Setup dialog change the name to “CONTACTS TOGGLE” (or any name that you wish!) and click the OK button. Click the “Open” button for the newly named layout.
Make changes in Layout Mode
Now we start revising, so enter Layout Mode (under the View menu or by shortcut shown on View menu or selecting the Layout from the bottom status area). Delete the two buttons that perform the switch in the header part on the layout.

Leave the “Find Contacts” text for now, it contains a “Hide object when” calculation that hides the text when we are in browse mode. It is this feature that we will use to help make the UI toggle smoothly.
To see this calculation, click on the text once and using shortcut command+I (mac) or cntl+I (wind), the Inspector dialog appears in the Data tab, Behavior section.
Get ( WindowMode ) = 0
Create the new buttons! Click on the Button tool in top status area of Layout Mode. Make it approx. 34×34 pts. The Button Setup dialog should appear. Click on the second button at the top, “Display only an icon”. Choose an icon that represents the “Form View”. Change the size to 32pt. Under Action, select single step and add the script step and click OK.
View As [View as Form]
In the Inspector for this new object (button): Under the Position tab change the size to 34 pt x 34 pt if not already that size. Change the left to 7 pt and the top to 7pt. Under the Appearance tab for Normal, set the Fill and Lines to none & all the Padding to 0. Under the Data tab, enter this into the Hide object when:
Get ( WindowMode ) ≠ 0 // hide if not Browse Mode
or
Get ( LayoutViewState ) = 0 // hide if in Table View
Duplicate this button. Click the button to change the icon to one that represents the “Table View”. Change the script assign to this new button and click OK.
View As [View as Table]
In the Inspector: Under the Postion tab change left to 30 pt and the top to 7pt. Under the Data tab change this in the Hide object when:
Get ( WindowMode ) ≠ 0 // hide if not Browse Mode
or
Get ( LayoutViewState ) = 2 // hide if in Table View
If you go to Browse Mode and try this now, you will discover that Table View is not part of this layout. Back in Layout Mode, click the pencil next to the layout name to edit the Views for this layout. After you check Table View, the Properties dialog will appear. Check the Header and Footer (or whatever you may have on your base ‘form’ layout). You want the same parts to appear on the Table View as on the Form View. Click OK on both dialogs.


Test the buttons
Now go back to Browse mode and test the buttons. Yes! the offset is exactly 23 pts between table and form views. So placing them as we did, they appear in the same screen location when you toggle between the views. You can see this best if you open a new window and toggle the view on the top window, then align the windows vertically.

Test for find mode! OOPS! There is one more setting in the Inspector just under the Hide object when. Check the “Apply in Find mode”. Now it’s correct in all modes all views (the two we allow).
Tips
- Put these on the layout in the header to see the values change as you toggle or change modes: WindowMode: {{WindowMode}} LayoutViewState: {{LayoutViewState}}
- Get ( WindowMode ) ≠ 0 in “Hide object when” also hides an object in Preview mode and the object does NOT print. No need to add the change the setting in Inspector, Position tab, Object visibility to “Hide when printing”.
- I also like to add the text {{LayoutName}} beside the buttons. Make a copy with the offset of 23pts on the copy and use the above ‘Hide object when’ calculations. This makes the buttons and text transportable to other layouts with no changes! YMMV, depending on how you name your layouts, of course.
Table View features
The other technique in this article is the ability to change the fields displayed in Table View without actually changing the fields in the layout (as in Form View). This gives us the one layout with two views! While in Browse Mode, toggle to the Table View.
Hide one column: Click on the arrow next to the column (field name) and in the drop-down, select Field and Hide Field. Do this for several fields you wan to remove.

Hide more than one column: When you have many fields to hide this way, it can be tedious, especially if the Form View layout has Tab Panels or Pop-overs or Portals. There’s a faster fix for this. Click the Modify button in the upper right.

Then in the dialog you can check/uncheck fields and reorder the column positions.
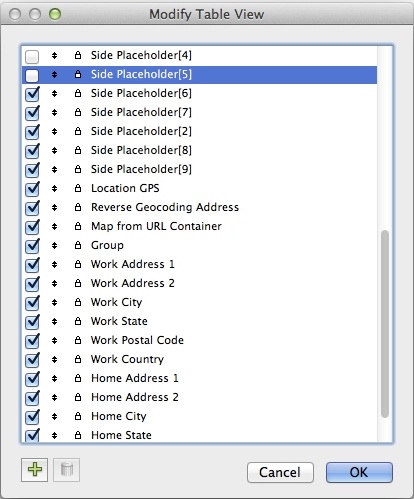
You can also rearrange and resize the columns in browse view.

Wrap up
I didn’t like the Find Contacts text, as it doesn’t hide in preview and doesn’t stay in the same visual position in the two Views. The Send by Email button (and icon) I also thought should be hidden in the Table View.
If you have a Top Navigation part, it will not ‘toggle’ correctly. You can choose to hide the objects, use button-bar tricks or other means to make Top Navigation work smoothly in one layout that toggles between Form View and Table View.
I use this technique, because:
- I need to have details, but like to quickly check a list in a found set of records.
- This is a quick way to print a table of data without the need for another layout.
- I can quickly sort and find in specific fields (less is more).
- I can quickly edit data in the most important fields shown in Table View.
- I can modify the fields shown or hidden for specific table reports, if needed.
- File=>Send/Save Records As->Excel only uses the fields in the Table if you are in that view.
- After I’ve put time into a design of a form, this is an easy way to add a Table “layout” without actually adding another layout.
Because this has button icons, the file only opens in FMP/FMPA 14. The same technique works in versions 13, if you use your own icons with the same offsets. Hide object when was first introduced in FM 13.x. More information in this feature can be found here:
Untested
FileMaker Go: does not allow Modify of Table View columns, but other functions should work.
Web Direct: Table View is unsupported in Web Direct.
Beverly,
This is a great tool. One addition when you want keep some users out of table view and let others in. You could add a user group check to the hide object for the buttons.
Thanks very much for posting this.
Absolutely, Bruce! There are always layers of security. In that case, scripted navigation and/or calculated go to, based on security is advisable. The table view may be ‘viewable’ without the ability to ‘modify’, for example, by users. Adding the security check in the “Hide object when” is a good tip, as it’s another place to limit navigation.
Yes. Thank you! A follow up on Bruce’s question. Is it possible to set up the table view so that the user can manipulate columns but not have access to the drop-down menu that allows them to delete fields etc?
Simon Clement
Manipulate how? If your access privileges don’t allow delete (or create) then the table view cannot be used for this. However, you would still be able to re-arrange and re-size columns. Is that what you meant?
Seems I accidentally posted twice.” Manipulate” as in resize or reposition. I can live with the “sort by value list”. Soyour comment has answered my question. One annoyance is I always hide the menu bar which means you lose access to the “Modify” button and there’s no script step to invoke it.
Thanks
Simon
Thanks! I have several layouts where users can toggle the view of a layout by hiding elements but this has always been in Form View mode. (Still waiting for FileMaker to give us layers. Although placing groups of objects within two separate single panel sliding panels and hiding each in turn is getting close).Your work suggests there’s many more options to consider!
I’ve always avoided table view because of interface limitations but this helps significantly. One issue is limiting what a user can do once in Table View. With layout access privileges I can stop a user adding or deleting fields but what I’d really like is to be able to is limit access to some or all of the drop-down actions available when clicking on a Field Header, such as “Sort by value-list”. Beyond the scope of what you’ve discussed but do you have any suggestions on this?
Regards
Simon
Custom menus can limit, so if they are used, then they are also a part of table view ‘access’. However, I’m not sure you can limit sort to just ASC or DESC and prevent the ‘by value-list’. I consider sorting by value list very useful in table view. Users must be taught how to use this in any view. Do they have access to Sort Dialog otherwise? If so, they can sort by many things there, as well.
And while it defeats the purpose (for me), you *can* HIDE the column headers altogether (in the Table View Properties dialog).
I’ve been playing with this a bit. Yes Custom menus can limit access to all sort options from the drop-down menu. One thing that’s confusing is how you can get the settings “correctly” so that clicking on headers sorts records?
Are you referring to really old behavior (many versions back) of a click on the column sorts ASC and another click sorts DESC?
FMP 13: I got stuck on ‘Click on the second button at the top, “Display only an icon”. Choose an icon that represents the “Form View”.’ Does this refer to FMP 14, perhaps?
Yes, that’s FM 14’s new buttons feature, Lorne! When I tested in FM 13, I just brought in a icon the usual way: Insert menu, Picture… & then found a jpg that was small and icon-like. There are icons in JPEG or PNG that are available ‘out there in the ether’, should you not have any. I used two icons that were the same size, of course, for the two “views”, then I applied the Format menu, Button Setup (using the same calcs).
Thanks Beverly. Otherwise, everything worked great!