
Demo file: 2026-may-multipurpose-demo.zip (in addition to the above)
If you are in a hurry, or prefer video explanations, I presented this material using a pre-release version of FM Clipboard Tool a few months ago on the FM Training TV Livestream. Here’s a link to the relevant segment — https://youtu.be/M9WWT_WE4qE?si=h6ODtftNk-a2Vlxe&t=2501
For a long time I’ve been intrigued by the idea of directly accessing FileMaker’s special XML clipboard and manipulating schema that way. The basic idea is to copy some schema, transform it via an external text editor (or, these days, perhaps via an AI engine), and then paste the transformed schema back into FileMaker Pro.
So, yes, I was intrigued, but hadn’t moved beyond the “maybe someday” stage. I knew that accessing the XML clipboard would require a plug-in and that there would be a bit of a learning curve — and also that there were a number of utilities out there to help make it easier — but a compelling need hadn’t arisen, until recently when I was asked to make a change to a scheduling system that I’d originally rolled out in 2012.

The scheduling system was built around NinjaCal created by Ernest Koe at Proof+Geist. NinjaCal is no longer commercially available, but appears in today’s demo file with Ernest’s kind permission (thank you Ernest!).
The user experience is straight-forward: days are selected or de-selected from the 12 month calendar by clicking the appropriate calendar “square”, which turns blue when selected via conditional formatting.
The client request was to make the selection color red instead of blue — what could be simpler than that, right? To answer that question, let’s dig a little into the underlying architecture.
Behind the scenes, the calendar year you see above is based on a single repeating field, with a whole bunch of repetitions. The day squares for a given month consist of a grid of 42 individually placed field reps (6 rows × 7 columns), with each field rep defined as a button — all calling the same “NinjaCal” script, but each with a distinct parameter. Here is a magnified one-month grid in layout mode with one button selected.
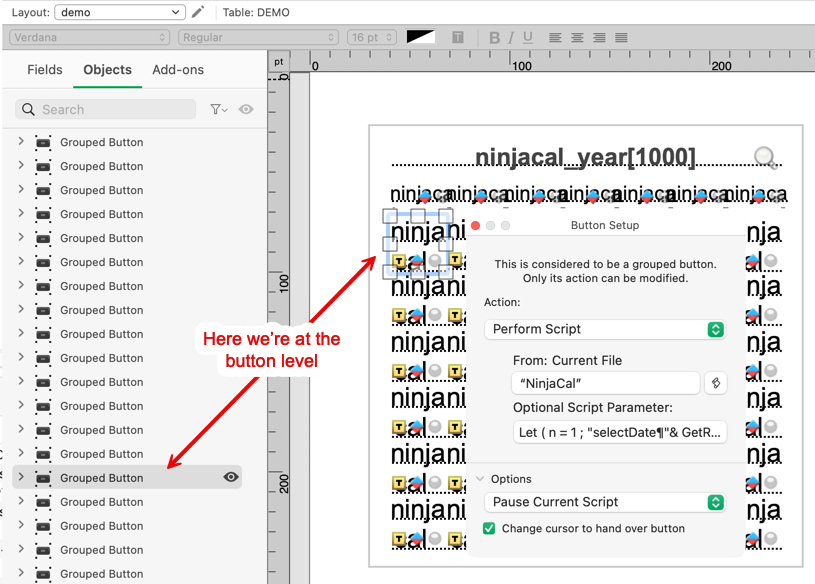
To get to the conditional formatting we need to go “inside” the grouped button and select the underlying field.

Conditional formatting is configured like this, and we don’t care about the first condition, because we aren’t going to change it, but we do care about the second one.
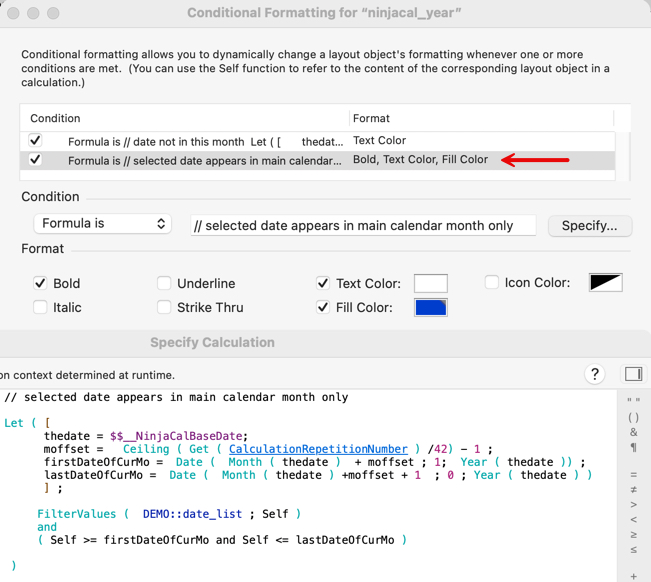
So that’s the current conditional formatting on a single “cell” (field rep). Let’s step back and consider the big picture. We have a total of twelve grids, one per month, so we need to alter the conditional formatting on 12 × 7 × 6 = 504 cells.
You may be thinking, “No big deal, just select all 504 of them and change the conditional formatting color from blue to red,” but unfortunately life isn’t that simple. Because each field has been individually buttonized, we can’t apply the conditional formatting in bulk — it must be applied to each field individually.
This would be a huge time sink to implement manually, and human error would likely creep in at some point during the process. Fortunately we can take a more efficient path by using a utility such as the free FM Clipboard Tool, a brainchild of Ivan Granger, which is now available via the Codence blog, and which you can learn all about here: FileMaker AI Foundations: FMXML and the Clipboard Tool
And thank you Nick Orr, because under the hood the FM Clipboard Tool uses, you guessed it, Nick’s amazing open-source BE plug-in — which Ivan’s utility will automatically install if necessary (and if you allow it).
The FM Clipboard Tool takes all the friction out of XML copy/paste, and allows us to build up a library of “snippets”, should we be so inclined. Once we have the XML on the clipboard we can feed it to an AI engine, or do what I did and search/replace in BB Edit. This was my workflow:
- FMP > Copy layout objects
- FM Clipboard Tool > Paste XML from clipboard
- FM Clipboard Tool > normal Copy
- BB Edit > Paste
- BB Edit > Find/Replace
- BB Edit > Select All, Copy
- FM Clipboard Tool > normal Paste
- FM Clipboard Tool > Copy XML to clipboard
- FMP > Delete obsolete layout objects
- FMP > Paste
To see this in action, download and open both the multipurpose demo and the FM Clipboard Tool.
Step 1. In the multipurpose demo, go into layout mode, select the entire 12 month calendar, and issue the copy command.

Step 2: Switch to the FM Clipboard Tool, give the snippet a name, and click “Paste Schema/XML”.

Step 3. Click “copy text”

Step 4. Paste into the text editor of your choice. (Note that there are over 200K lines of XML code.)

Step 5. Search on “selected date appears in main calendar month only” to locate the first matching relevant section, then do a search and replace to change all instances of the highlighted text…

…to this:

Step 6: Select all, copy.

Step 7: In FM Clipboard Tool make a new snippet, give it a name, and paste.

Step 8a: Copy the transformed XML

Step 8b: You will see a confirmation dialog like this.

Step 9. (If you follow these instructions exactly you will paste at precisely the same coordinates as the original.) In the multipurpose demo return to browse mode. Switch to the “demo 2” layout. Enter layout mode and do not click anywhere. Now paste.

Step 10. Switch to browse mode and admire your handiwork. 
Does it work? Yes, perfectly. Thank you Ivan Granger and Codence/Fullcity.
Thanks for the tip, Kevin. You may wish to know that VS Code natively both reads and writes XML to/from the FileMaker clipboard. Something I discovered quite by accident a while ago. Also, Claude (or other LLMs, I suppose) understands the FileMaker XML grammar and will perform any edit in a flash. Great for writing/debugging scripts and use VS Code as a go-between.
Could you explain how that works on your system? When I copy FileMaker script lines or layout elements to the clipboard, I cannot paste that into Visual Studio Code (FMP 22, VSC 1.122.1, macOS 26.5). Nothing happens. Did I misunderstand that or do you use plug-ins for that on either side?
You’re right. It’s not a feature of VS Code at all. Apparently it’s the MBS plugin that enables this and you can actually paste the XML anywhere so no need to go via VS Code as I assumed. I don’t know if the feature is available in the free version of MBS but it’s worth a try.
Ah, I see. Who else but them would build something like that :)
What a great use case for this (and a clear and straightforward explanation for how to implement it)! Thank you!