About the author: Beverly Voth has been in the Claris FileMaker community many years. In addition to FileMaker Pro & its integrated products, she is a Full Stack Web developer & SQL database administrator. The only recipient of the FileMaker Excellence Award for Outstanding Contribution to the FileMaker Web Publishing Community (DevCon 2003), she’s been advocating Claris FileMaker and web since they could work together.
This is the first in a series of articles exploring portions of the new Claris Platform. Launched in September 2022, this is just the beginning of the journey! Curious souls that we are, many question arise, and these articles are meant to supplement what we’ve seen so far, and perhaps give some different perspectives, along with plenty of screen shots. Concentration in these articles will be on Claris Studio and its relationship with Claris Pro.
Disclaimer: This platform may have rapid changes and this article may not be current after it is published. Always check for the latest information & videos.
What is Claris Studio?
Claris Studio is a cloud-based (access through a web browser) editor and data browser. A Claris ID is used to login and teams can be invited to join (by Claris ID). Access to view or edit can be constrained by inviting team members to Hubs with shared Views. The editor can create: Forms, Spreadsheets (tables), List-Detail Views, Dashboards (with charts and summary data), and Kanban Views. Some basic Views are preset for you to use as examples when you first start. There are many tooltip hints and popover & other dialogs to assist you along the way.

Once a View is published/shared, an “https” link (URL) is created that can be given to anyone. This View can be unpublished/unshared at anytime and will no longer be a valid link. Anyone with the link can view the page in a browser without login, until you no longer share. If the page is a form, it may be completed and submitted. Data is collected anonymously and stored. Other views may have different Share options (see chart, “Claris Studio Views – features” below).
Data stored (in a MongoDB) is available to be seen in various Views that you can create. Data may be added, changed, or deleted in a View by anyone with access to that View by Claris ID login. The data stored can also be viewed in Claris Pro (with the same Claris ID login), as an external data source. No Web “programming” or MongoDB “administration” is required. In addition, tables of data can be Migrated from Claris Pro to Claris Studio. Data stored this way can be used in the Views created using the table migrated.
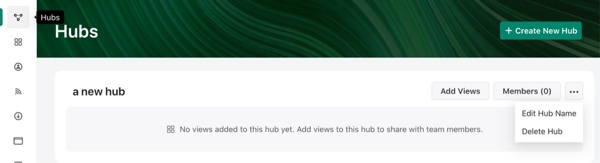
Tell me more! What are Hubs?
The Hub is a “grouping” method to add created Views, and invited team members. Views in a Hub may be removed at any time, but this just breaks the association and does not delete the View. Hubs may be Deleted and the Views (and Members) are no longer linked with them. You get a handy warning dialog before deleting. You might think of them as a “menu” with sub-menus. As a Manager, you can see all menus and Members can only see the Hubs and Views where you have invited them.
Video – Claris Studio: Hubs
Views: what kinds are there & what do they do?
Views can be added to many Hubs, but deleting the Hub does not delete the View. Deleting a View removes from all Hubs where it was previously added. Invited Team members can only see the Hubs and Views in them. On this page, you can also Sort by: Last Modified, Name, or Related Views. The related views will “group” all views that use the same table.
From this page with thumbnails of all views, you can: Edit View Name, Modify Public Sharing, & Delete View. Just click on the “…” in a View header. You can get the info on a view, by clicking on the view-type icon on the left of each view’s thumbnail header. A shared View will have a “Public” label in this header, too. All of the icons have tooltips when you hover over them.

You can create other views from a View, but they may be different per view, so check the “document icon” for the views you can create. Each View may have default fields that are created, if you make a new view. Each view type may have different sharing actions.

Video – Claris Studio: New views of your data
1. Form Workflow Overview
This View is used to create web forms for anonymous data collection. Forms can have many pages in the workflow, but only one table of data (no related tables at this time). You add fields & objects to the form. You may delete an object on the form, by clicking the “…” next to the gear icon, in the upper right of the object. Fields may have the Label and Placeholder text edited as well.
Some objects (or fields) have settings that you can change per field/object. It might be the required option on a form field that must contain data for submission. Each field will have the asterisk (*) next to the field name if it is required, for example. Some fields will have automatic validation (phone number, or email address). You can move the objects around on the page, by dragging.

The top header on the new Form Workflow editor has: Sidebar (where you can see the table and fields), Add Object (drop-down of available fields & other objects), Preview (what the form will look like on 3 different devices), & Share (to make the form published to submit data).

Before you go into Preview you are given a warning dialog:

The Preview top menu for Forms has: a toggle for Light or Dark Mode, Device selection (widths for: desktop, tablet, or mobile phone), Return to edit mode, & Share. Public Sharing this kind of Form View, allows anyone to view all pages in the workflow and submit data.
Once you have your Form View created, you can create additional views from it.

2. List/Detail Overview

Similar to the FileMaker Pro & Claris Pro, “current-table portal/list”, this View shows you the listed “content” of the found set (filtered & sorted) on the left column and the details of the selected record/row in the right column. The Detail is created like the Form by dragging objects on to the main detail. The List has options of what field(s) to show. This View can used for data entry & display. You can change the settings on parts of the form in several places by clicking the gear icon. You can also create a Spreadsheet from this List-Detail View. When you Share this view, these actions can be done (by anonymous users): Add records and edit data.
3. Kanban Overview

This kind of View has “cards” that can be edited and moved from one column to another by drag-drop. You can create a Spreadsheet view from the data on the Kanban board. When you Share the Kanban view, users can: Add and delete records and fields, & edit all data. On the top menu while designing, you will find: Group by, Filter, Sort, Search, Columns, & Customize Card.
The Columns popover allows you to hide/show columns without deleting them. Customize Card allows you to decide up to 4 fields on the card:

4. Spreadsheet (table) Overview

This view is somewhat similar to the Table View in Claris Pro, but is more closely related to Data Tables (HTML, JavaScript, & CSS) in the web viewer. The big difference? This has more features and is easy to create, edit, and use.
When you migrate a table from Claris Pro, this is the view that is created. You may create these views from a Spreadsheet: Form, List-Detail, & Kanban. In addition there is a menu to create Dashboards (charts) from the data in Spreadsheets. Shared Spreadsheets allow these: Add and delete records and fields, & edit all data.
These are the main features:
- The top menu has: Table (Rename, Edit Description), Filter, Group, Sort, Search, Columns (show/hide), Create Dashboard, Table Actions (Import CSV, Export CSV), Density (row height).
- Columns headers can be re-arranged and have popover menus of options.
- There is a “+” and the end of this header “row” to add new fields (Add Column with Select Field Type popover dialog).
- Rows can be added, and re-arranged with drag/drop.
- The Row “header” has a click to show a popover to edit the records in a Form. You can Add New Field in this dialog, as well.
- “Cells” (data fields at the intersection of the Column & Row) can be edited. Depending on the field/column type of data, different popovers may appear for the edit (calendar, large text, image/file, option list selection).
- A “footer” row at the bottom of the spreadsheet allows you to create a Summary of the column. This popover selection on any column in this row will give you different options based on the field/column type.
5. Dashboards Overview (charts & summaries)
Dashboards are the charts and summary fields, meant to be view-only with the shared link. This can be a link sent in an email, or perhaps used in a Claris Pro Web Viewer. You cannot create another view from this one. Use the Spreadsheet to create different Dashboards as needed. This is the Add Object popover for Dashboards:

Summary Objects
You choose: the Table, Field, Label (optional), and can Filter the data from the table.

Summary Types are: Sum, Average, Median, Min, Max, Range, Standard Deviation, Empty, Filled, Unique, Percent Empty, Percent Filled, Percent Unique.
Charts
You can create Bar, Pie, & Line charts from Spreadsheet data.


Is this all there is?
Of course not! There will be follow up articles here with more details and screenshots. The Spreadsheet (table), for example, has some very nice features not noted in the Overview, above. Claris Pro features that work with Claris Studio will also be in article.
Checkout some of these links for information from Claris:
Ch-ch-changes (04 OCT 2022)!
Claris has already changed & added some goodies! Some of the screenshots are no longer the same in this article, so take the disclaimer, above as serious! Bookmark this link for lists of new features as they update frequently!
Great overview of Claris Studio! I am curious about what we can do with the MongoDB backend. Does FileMaker transform a “regular” table into a JSON pair document in Mongo? Can we see it or modify it directly?
That’s a great question for Claris! See the link to the Claris Community #studio topic. They are asking us for feedback and requests!
I feel like I have a better understanding of Claris Studio from skim reading this in 5 minutes than I’ve gotten from months (or years?) of marketing from Claris! Thanks Beverly, looking forward to the next instalment.
Thank you, James!
Thanks Bev for helping the cause of the future of our platform.
—
Rick Kalman
Director Product Management
Claris International Inc.
You *knew* what was going to happen, right? Me writing about it! LOL
Although I do welcome any positive addition to the Filemaker platform I would have preferred a proper development environment I could host on my own server. Call me “old fashioned” but although I do see the benefits of clouds and cloud hosting this does introduce, to me, an added risk of problems.
Thank you, Hans! Please post your feedback on the platform to Claris! The link to the Community topic and/or the link inside Claris Studio. They need to hear all our hopes & dreams. My articles are meant to inform with what is there and not what should be there. My platform feedback goes to Claris.
What’s New (18 OCT 2022): Changes are out. The above chart showing sharing by View type has changed. Anonymous sharing is now ONLY available for the Form View. All others allow access to teams (login with Claris ID), but no longer anonymously.
See the other additions: https://help.claris.com/en/studio-help-center/content/whats-new.html